cloudwafercloudwafer
  • Home
  • Knowledge Base
  • Products
    • Web Hosting
    • Dedicated Server
    • Domain
    • Cloud DNS
  • faqs
  • Client Area
  • Get Support
  • Home
  • Knowledge Base
  • Products
    • Web Hosting
    • Dedicated Server
    • Domain
    • Cloud DNS
  • faqs
  • Client Area
  • Get Support
home/Knowledge Base/cPanel - Control Panel/How to create NodeJS Application in cPanel

How to create NodeJS Application in cPanel

88 views 0 December 13, 2022 Updated on December 15, 2022 cloudhelp

Setup Node.js App in cPanel

This tutorial will show you how to easily deploy Node.js applications using the cPanel graphical interface.
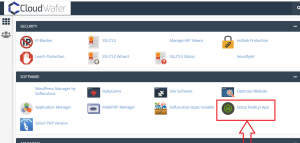
1. Log into cPanel

2. Choose Setup Node.js App under Software

nodeJS set up on cPanel

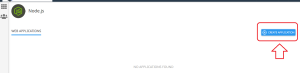
3. On the Node.js selector page, click on the Create Application button to start the application setup.

Create nodejs APP


4.Fill in the required fields on the application setup form. (this is the directory in which you will upload for application files)

Create node js application on cpanel

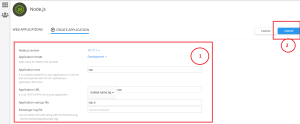
  • Application Mode: Select the mode from the dropdown list, the mode can be in Development or Production. You can choose Development initially and change it to Production later on.
  • Application Root: application root directory relative to the user’s home
  • Application URL: the public URL to your application
  • Application startup file : the initial file that will be processed when launching the application.

5. Select your Application URL and startup file (if you do not name a startup file, app.js is used as the default)

6. Click Create when ready.

Was this helpful?

Yes  No
Related Articles
  • How to create sub-domain via cpanel
  • How to Access cPanel Web Disk
  • How to Create an Additional Web Disk Account in cPanel
  • How to Edit or Remove a Record in cPanel
  • How to Edit or Remove а CNAME Record in cPanel
  • How to Add a CNAME Record in cPanel

Didn't find your answer? Contact Us

Leave A Comment Cancel reply

Popular Articles
  • How to make payment
  • How to Install Dotclear via Softaculous in SiteWorx
  • How to Remove a Post in WordPress
  • How to Change the VNC Password in SolusVM
  • How to Edit an Account Level/Global Email Filter in cPanel
KB Category
  • Billing
  • Databases (da
  • General (Plesk
  • Softaculous (SiteWorx
  • Domain Management (Plesk
  • Backup/Restore (Plesk
  • Mail Filters & SPAM (DA
  • FileZilla FTP Client
  • others(cpanel
  • SSL
  • Backup/Restore
  • Wordpress
  • DNS – Nameservers
  • Cloudwafer Manager – Hosting
  • SolusVM Basic
  • Security (SiteWorx
  • CloudLinux (DirectAdmin
  • Domain Management
  • cPanel – Control Panel
  • Domain Management (DA
  • WHM
  • Forum(cpanel
  • Forum (SiteWorx
  • Blog (SiteWorx
  • Others (SiteWorx
  • Backup/Restore – SiteWorx
  • Virtualizor Basic
  • SolusVM VPS Management
  • CloudLinux (Plesk
  • Mozilla Thunderbird
  • Domain Management – SiteWorx
  • SiteWorx Basic
  • FTP (Plesk
  • Email (Plesk
  • Backup/Restore (DA
  • Email (DA
  • Email (SiteWorx
  • Virtualizor VPS Management
  • FTP (DA
  • CloudLinux (cPanel
  • DirectAdmin
  • PayPal
  • WHM (For Resellers
  • CMS/Portal (SiteWorx
  • Databases (Plesk
  • Post Features
  • FTP (SiteWorx
  • Databases
  • Installing a Control Panel
  • Android
  • Blog (cPanel
  • CMS/Portal
  • iOS/Apple
  • Outlook 2019
  • Cloudflare (cPanel
  • WHM (Root
  • FTP (cPanel
  • Security (cPanel
  • Softaculous
  • Mail Filters & SPAM – cPanel
  • Email (cPanel

  Fix PHP Error: Allowed Memory Size of X Bytes Exhausted

Company
  • About us
  • Client Area
Hosting Products
  • Web hosting
  • Dedicated Server
SUPPORT
  • Knowledge Base
  • Faqs
SOCIAL
  • Facebook
  • Twitter
  • Privacy Policy
  • Terms of Use
  • © 2022 CloudWafer. All rights reserved.